
Samba Server Introduction:

In this blog, we shall talk about a technique for sharing files and folders. The sharing of files and folders is an important task because it removes the dependency of removable drives and at the same time we can use the unused bandwidth of our local network. There are different softwares that can be used for this task. One of them is Samba Server. One of the most important features of Samba is it can work on both Windows and Linux.
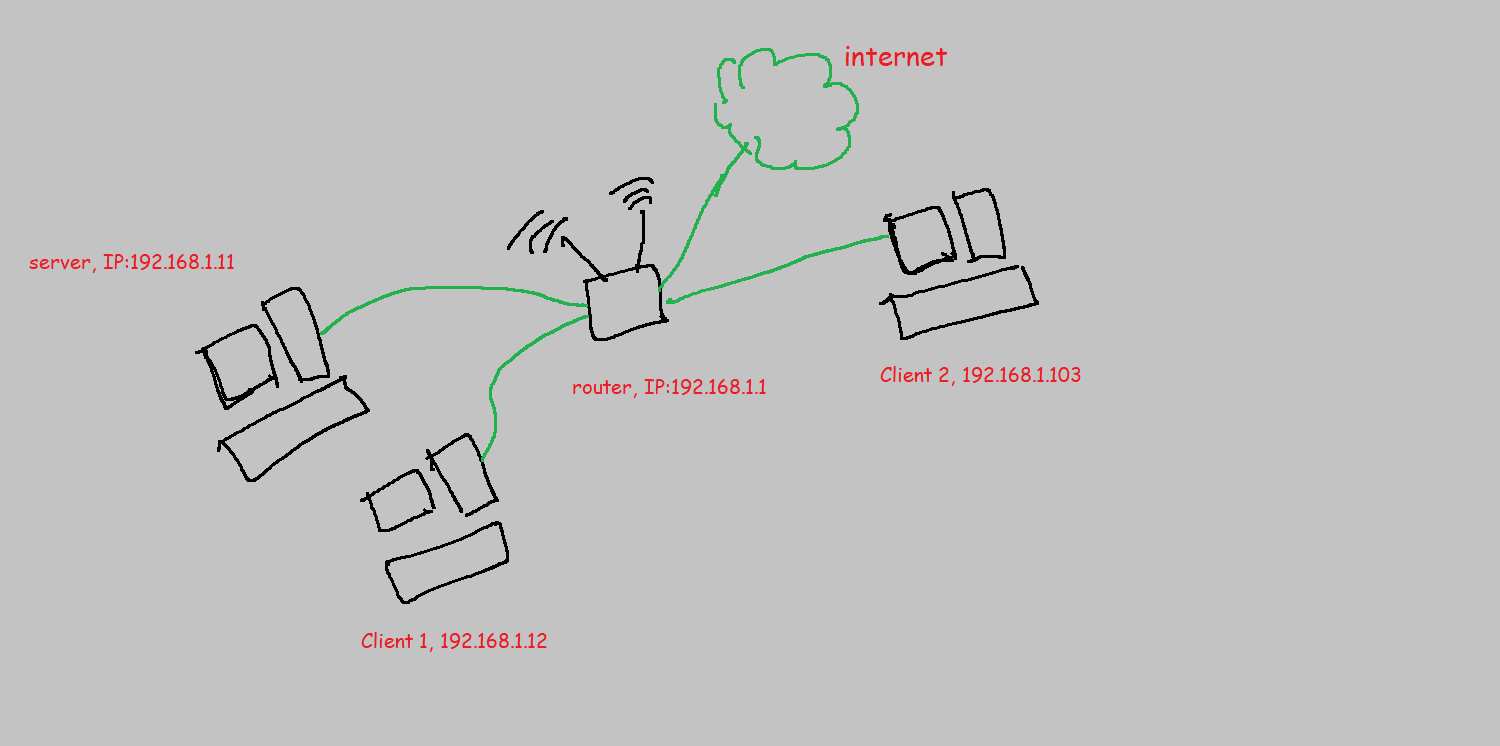
Let’s think of a scenario, where we have a router that is connected to the internet and we have a couple of computers connected to the router. Refer to the picture below for reference.
What is a Samba?
Samba is free software licensed under GNU License. It provides a secured and stable environment for all clients using Linux and Windows machines.
In other words, we can think samba is like a bridge between two different worlds. For example, file systems of Linux and Windows are completely different but Samba can integrate both the file system into one.
How samba server can be helpful?
Samba server can be helpful in many ways. Firstly, we can make use of the old computer that is sitting ideal in our homes. Secondly, we can utilize the unused bandwidth of our home network.
Thirdly, Samba Server can provide us our own local cloud system. The data that is stored in the old computer(Samba Server) can be access by the devices inside the network. Here, data mean it can be songs, movies, games, data files etc.
Prerequisite for setting up the samba server:
Now, there are few requirements for setting up Samba server.
The List is as follows:
- One Router.
- One old computer with Debian family linux(this will be our server).
- Maybe a mobile device or a computer(this will be our client).
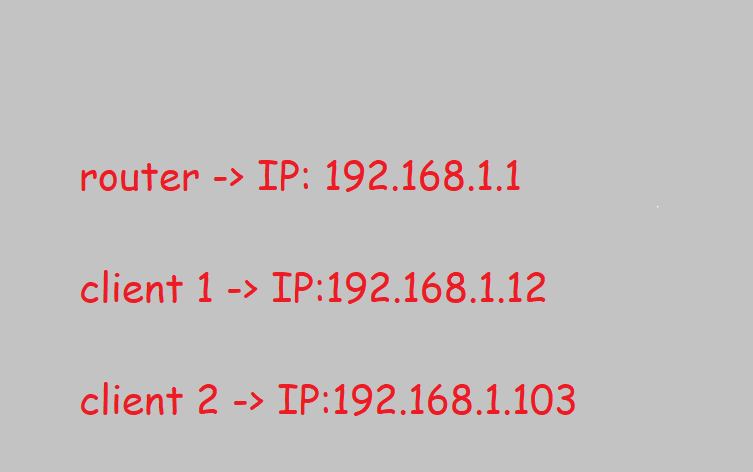
As these devices are connected to the network. Router allocates unique IP to each device. Therefore, in our case, the IP address are as follows:
Steps to set up Samba Server:
- Installing samba and its components:
            #apt-get update
            #apt-get install samba*
            #whereis samba
Upon executing, the above command, the following should be the output:

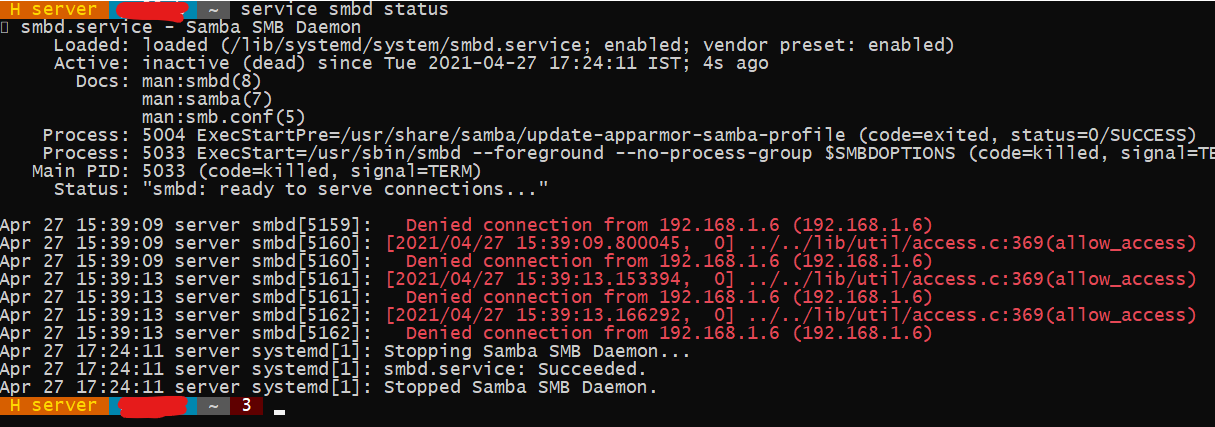
- As we have installed the samba server, now we shall check the status of the Samba process/service.
#service smbd status
 There are few others options that helps to handle samba service:
           #service smbd start
           #service smbd restart
           #service smbd stop
- Now we shall tell the firewall to allow samba traffic.
#ufw allow samba
- We shall create a folder. This folder will common storage place.
#mkdir /home/some_user_name/sharefolder
Replace the some_user_name with the user name.
- Samba needs a password for each user who will access the folder. This password is not the user password of the server(Linux), it is an exclusive samba password. You will need to enter this password on the client-side.
#smbpasswd -a username
- Now we shall configure the samba configuration file. This file is known as smb.conf and it is located at /etc/samba/. Therefore, the full path is /etc/samba/smb.conf
Add the following code at the end of the file.
            [shareName]
                path=/home/username/sharefolder
                read only=no
                writable=yes
                browseable=yes
                valid users=user1
                hosts allow=192.168.1.201
Details of smb.conf :
[shareName]: It is the connection name that will be displayed on the client screen.
path: this path points to the location of the folder that will be shared.
read only: if it is yes, then only read operation will take place.
writable: when yes, then we can create or paste files and folders inside this directory.
browseable: when it is no, we cannot see the [shareName] explicitly. We have to write the share name manually after the IP address of the server.
For example \\192.168.1.40\sharename
valid users: we give the list of users or a group name. For example, valid users: user1, user2.
hosts allow: it takes a list of IP addresses of the client machines that can access this share.
- Save and exit the smb.conf file.
- Make sure to start the samba service.
#service smbd start
Till this stage, we have configured the samba server machine. Now on the client-side(Window machine), we have to open a file explorer and in the address just enter the IP address of the server.

How to allow specific IP address to access files?
Remember “hosts allow” that we had discussed. If we write one more “hosts allow” somewhere on top of smb.conf then the share names will be visible to those specified IP address.
Therefore, we can specify who to access this share in two ways. First way: we shall specify “hosts allow” on top smb.cnf. Second way: specify hosts allow under a specific share name.
Conclusion:
In this blog, we discussed how to configure the basic samba server. The most important part of the samba configuration is the smb. conf file. It can be tweaked in many different ways. In the above case, it was a simple samba where we have not user restriction on files but when we shall look for advances in samba we shall look into that as well.