
 Posted by
Introduction
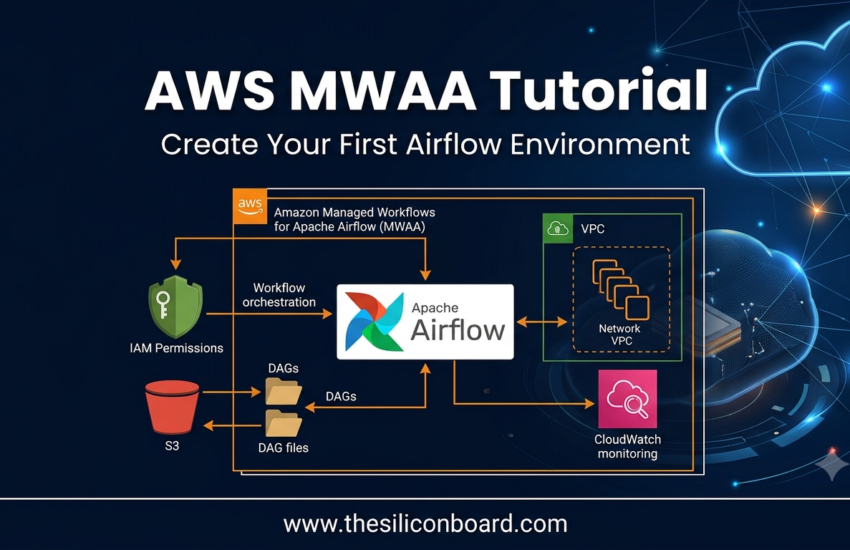
AWS offers several managed services that help engineers focus on building solutions rather than managing infrastructure. One such service is AWS MWAA (Amazon Managed Workflows for Apache Airflow).
If you’ve ever installed Apache Airflow manually, you’ll know that setup, dependency management, configurations, upgrades, and troubleshooting can quickly become frustrating. AWS MWAA solves this problem by providing a fully managed Apache Airflow environment.
In this tutorial, we’ll walk through the basics of AWS MWAA and learn how to create your first MWAA environment step by step.
What is AWS MWAA?
AWS MWAA (Amazon Managed Workflows for Apache Airflow) is a managed service that allows you to run Apache Airflow without handling the underlying infrastructure.
Instead of installing Airflow on an EC2 instance and managing configurations yourself, AWS takes care of:
- Infrastructure management
- Airflow installation
- Scaling
- Maintenance
- Patching
This allows engineers to focus on creating workflows rather than maintaining Airflow servers.
Apache Airflow vs AWS MWAA
Apache Airflow (Self-Managed)
When running Airflow yourself, you need to:
- Install Airflow
- Configure dependencies
- Manage upgrades
- Fix configuration issues
- Maintain underlying servers
Even a small configuration mistake can prevent Airflow from working correctly.
AWS MWAA
With AWS MWAA:
✅ AWS manages the backend infrastructure
✅ Faster deployment
✅ Less operational effort
✅ Better integration with AWS services
✅ Built-in monitoring support
Important Cost Warning
Before creating an MWAA environment, you should understand its pricing implications.
AWS charges not only when the environment is running but also during:
- Environment creation
- Environment deletion
Creating an MWAA environment can take around 30 minutes, and this time is also billable.
Recommendation: Avoid experimenting with MWAA in a personal AWS account unless you fully understand the associated costs.
Step 1: Open AWS MWAA
Log in to the AWS Console.
In the search bar, type:
MWAA
You should see:
Amazon Managed Workflows for Apache Airflow
Open the service and click:

Create Environment
Step 2: Configure Environment Settings
Fill in the basic details:
Environment Name
Example:
my-environment-45
Airflow Version
Select the latest available Airflow version.
AWS also displays maintenance information and upgrade details during this phase.
Step 3: Configure the S3 Bucket
This is one of the most important parts of MWAA setup.
Your S3 bucket stores:
- DAG files
- Dependencies
- Startup scripts
- Plugins
Required Folder Structure
S3 Bucket


│


├── dags/


├── requirements/


└── startup/
Creating these folders before setting up MWAA helps streamline deployment.
Understanding the DAGs Folder
A DAG (Directed Acyclic Graph) represents a workflow.
Example:
Extract Data


↓


Transform Data


↓


Load Data
All your workflow definitions are stored inside the:
dags/
Step 4: Configure Dependencies
Why Requirements Matter
Many Airflow DAGs use external Python libraries.
For example:
import requests
The requests library may not be available by default.
AWS MWAA provides two ways to install dependencies:
requirements.txt
Used to install Python packages using pip.
startup.sh
Used when more advanced installation steps are required.
Step 5: Configure VPC and Private Subnets
AWS MWAA requires a VPC.
Inside the selected VPC, you should have:
- Private Subnet 1
- Private Subnet 2
These private subnets are used by MWAA components.
During testing, you can adjust access settings later, but production deployments should follow AWS networking best practices.
Step 6: Configure Security Groups
Attach an existing Security Group to your MWAA environment.
Security Groups control:
- Network access
- Inbound traffic
- Outbound traffic
- Connectivity between AWS services
Choosing the right Security Group is critical for securing your Airflow environment.
Step 7: Select Environment Class
MWAA allows you to choose an Environment Class.
Example:
mw1.small
This determines:
- Compute capacity
- Scaling behavior
- Worker performance
For smaller DAGs and learning environments, default values are typically sufficient.
Step 8: Enable CloudWatch Logging
For better monitoring, enable logging for:
- Scheduler Logs
- Worker Logs
- DAG Processing Logs
Recommended Log Level:
INFO
These logs help diagnose workflow failures and monitor Airflow activity.
Step 9: Attach an IAM Role
MWAA requires an IAM Role to interact with AWS resources.
Typical permissions include:
- S3 Access
- CloudWatch Logging
- Lambda Invocation
- Glue Access
- Redshift Access
Without a properly configured IAM role, MWAA cannot execute workflows successfully.
Step 10: Create the Environment
Review all settings and click:
Create Environment
AWS will begin provisioning the environment, creation process can take approximately 30 minutes.
🎥 Watch the Complete Video Tutorial
If you’d like to see the entire MWAA setup process in action, watch our step-by-step video tutorial below:
AWS MWAA Setup Checklist
Before creating the environment, ensure you have:
✅ S3 Bucket
✅ DAGs Folder
✅ Startup Script
✅ VPC
✅ Two Private Subnets
✅ Security Group
✅ IAM Role
✅ CloudWatch Logging Configuration
✅ Cost Awareness
Final Thoughts
AWS MWAA is an excellent solution for teams that want the power of Apache Airflow without spending time managing infrastructure.
While MWAA simplifies deployment significantly, successful implementation still requires proper planning around networking, S3 structure, IAM permissions, and dependency management.
Once these foundations are in place, AWS MWAA can dramatically reduce operational overhead and help teams focus on building reliable workflows and data pipelines.