

Preface:
MongoDB is a free and open-source No-SQL document database. It’s extensively used in web applications and NLP. By default MongoDB connects to localhost(127.0.0.1). Therefore we can access all databases and its services on the same computer where it is installed. But there are times when we require to connect MongoDB to a remote location. In this blog, we shall go through each step which will help us to configure MongoDB in a remote system.
Environment Setup:
We have two computers. Both of these are connected to a local network. System one will be our server(IP: 192.168.1.11). It uses Ubuntu OS and MongoDB resides here.
System two: it will act as our client machine(IP: 192.168.1.201). It uses Windows OS and Robo3T software to access it.
Step 1- Install MongoDB:
To install any packages in Debian based OS, “apt-get” command is used. Therefore to install MongoDB in ubuntu we use: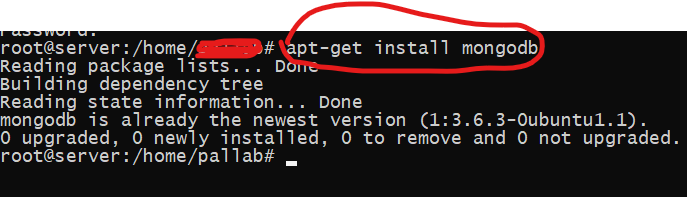
Make sure you are in root(“#”).
Step 2-Check MongoDB service status:
“systemctl” is the command that is used to check the status of any service including
MongoDB.

There are 4 widely used arguments for systemctl that are start,stop,restart,status.
Like in the picture above we have used “systemctl status monogodb”. The second yellow encircle highlights “Active: failed”, which means MongoDB not running.
As MongoDB is not running, we start the MongoDB service by the following command
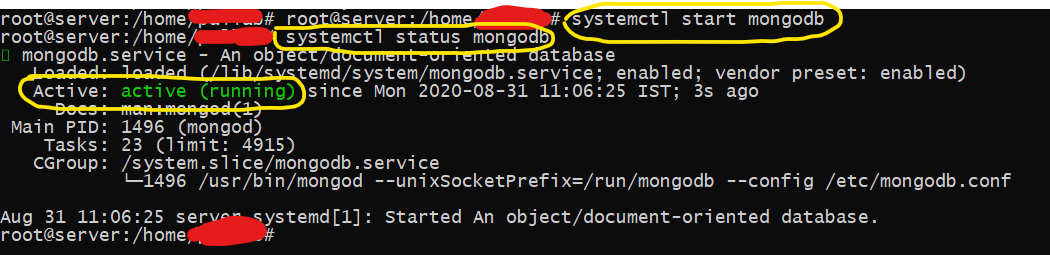
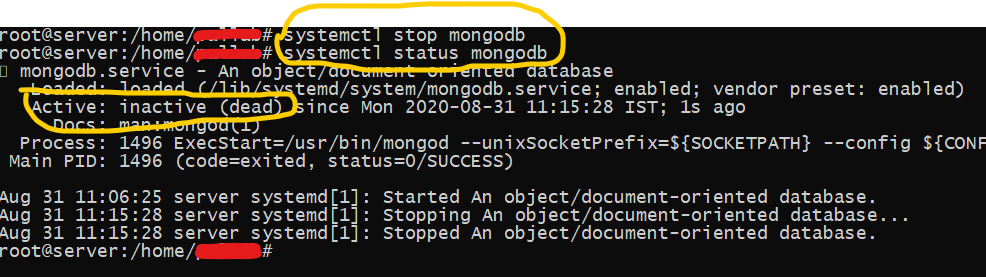
The command “systemctl start mongodb” will start the MongoDB server. If you look at the last yellow circle, the status is “active (running)”. Likewise to stop MongoDB service we use
“systemctl stop mongodb”
There is one more command that shows a few more details about MongoDB service and port number, and version of monogoDB ect. i.e “ mongo –eval ‘db.runCommand({ connectionStatus:1})’ ”.

Step 3-Firewall and MongoDB settings:
By default, other machines can not access MongoDB which is running on system one(192.168.1.11). Therefore, to make it accessible to other machines, there are two important steps to make MongoDB accessible to the local network. First. Open the firewall and IP address entry. Both of these settings are done on the server-side(192.168.1.11).
Generally, MongoDB service runs on port 27017. To make it accessible within the network we can use the command: “#ufw allow 27017”. Here “ufw” mean uncomplicated firewall However, executing this command, makes MongoDB visible every computer in the network, which can be vulnerable. Therefore making mongodb service visible to a specific computer we can use the following command:

We can verify which IP address is allowed on with port by “ufw status” command.
In the picture below we can observe that IP 192.168.1.201(client computer) is allowed to access port 2017 on the server-side(192.168.1.11)

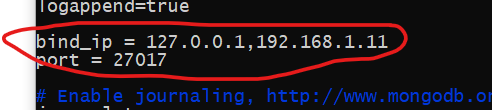
At this state, even though for server port 27017 open to 192.168.1.201 but MongoDB can only intercept requests from localhost(127.0.0.1) only. Therefore to make it open for other machines, we have to write the server’s IP address in mongod.conf file. “mongod.conf “ is located inside “/etc” directory. In the picture below, by default, there is only one entry,i.e 127.0.0.1.
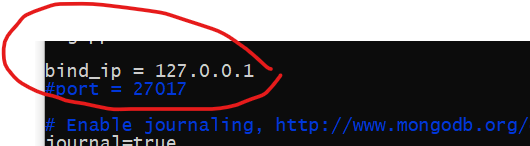
As shown in the picture below, we shall enter our server’s IP address just beside 127.0.0.1 separated by a comma.
After this entry, save and restart MongoDB, by executing “systemctl restart mongodb” command and check the status if it is running.
Step 4-Client-side access check:
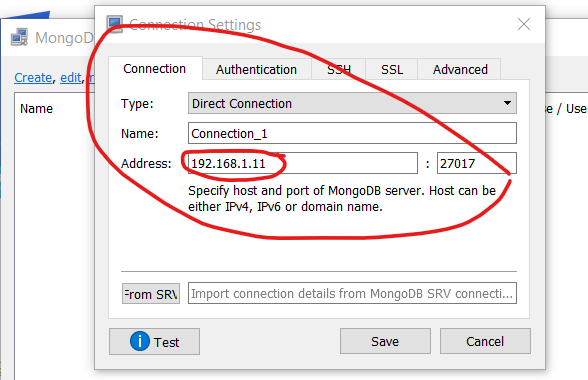
On the client-side, install robo3t or we can use pymongo to access the database. Open robo3t, go to File->Connect and we shall get:

Click on create and enter the IP(192.168.1.11) address of the server.
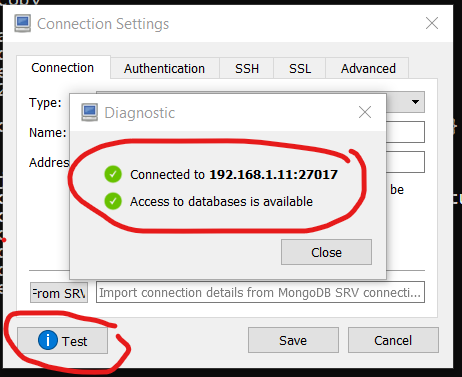
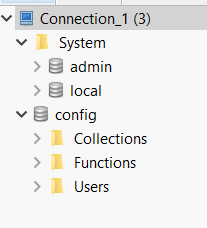
Once connected, we can see all the databases on the server-side.
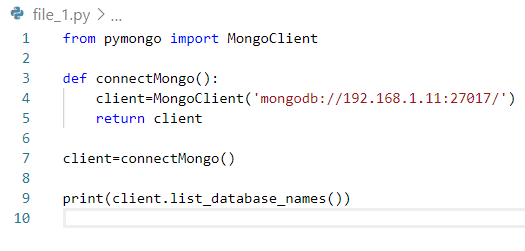
Connecting MongoDB using pymongo:
In our next article, we shall discuss MongoDB authentication.